Irresistible Boston Cream Pie Recipe – 5 Simple Steps to Perfection
There’s something magical about a classic Boston Cream Pie – that perfect balance of fluffy cake, creamy custard, and glossy chocolate that makes it irresistible. I still remember the first time I made this ultimate Boston Cream Pie recipe for my husband’s birthday. The look on his face when he took that first bite? Priceless! What I love most is how deceptively simple it is to make, yet it feels like such a special treat. Whether it’s for a celebration or just because you deserve something sweet, this easy dessert cake recipe never fails to impress.
The beauty of this Boston Cream Pie lies in its simplicity. You probably have most ingredients in your pantry already. Just a few basic steps separate you from that first heavenly bite where the silky custard meets the tender cake beneath that rich chocolate blanket. Trust me, once you try this version, you’ll understand why it’s been my go-to dessert for years.
Why You’ll Love This Ultimate Boston Cream Pie Recipe
Let me tell you why this recipe has stolen my heart (and probably will steal yours too!):
- Effortless elegance – Looks fancy but comes together with simple techniques even beginner bakers can master
- That perfect texture – Fluffy sponge meets velvety custard under a crackly chocolate shell in every bite
- Make-ahead magic – Tastes even better after chilling, so no last-minute stress for parties
- Crowd-pleaser power – Works for birthdays, holidays, or just because Tuesdays deserve dessert too
Honestly? The hardest part is waiting for it to chill before digging in!
Ingredients for the Ultimate Boston Cream Pie Recipe
Let’s gather everything you’ll need to make this dreamy dessert! I’ve learned the hard way that having ingredients at the right temperature makes all the difference. Here’s what you’ll want to pull together:
- 1 cup all-purpose flour – Spoon and level it!
- 1 cup granulated sugar – This is what gives our sponge cake its perfect sweetness
- 1/2 cup unsalted butter, softened – Leave it out for an hour (should indent slightly when pressed)
- 2 large eggs, room temperature – Cold eggs can make your batter curdle – trust me, been there!
- 1 tsp pure vanilla extract – The good stuff makes all the difference
- 1/2 cup whole milk – Room temp works best
- 1 1/2 tsp baking powder – Check it’s fresh!
- 1/4 tsp salt – Just a pinch to balance flavors
- 1 cup custard or pastry cream – Homemade is heavenly, but store-bought works in a pinch
- 1/2 cup heavy cream – For that luscious chocolate glaze
- 4 oz semisweet chocolate, chopped – Or use chocolate chips if that’s what you’ve got
See? Nothing too fancy – just simple ingredients that transform into something spectacular. Now let’s get baking!
Equipment You’ll Need
Don’t worry – you won’t need any fancy gadgets for this Boston Cream Pie! Here’s what I always grab from my kitchen:
- Two 9-inch round cake pans – The perfect size for those beautiful layers
- Mixing bowls – One large, one medium should do the trick
- Electric mixer – A hand mixer works great if you don’t have a stand mixer
- Whisk – For smoothing out that custard
- Spatula – To scrape every last bit of batter (no waste!)
- Cooling rack – Essential for letting those cakes breathe
- Saucepan – Just a small one for heating the cream
That’s it! See? Nothing too complicated – just the basics to create something extraordinary.
How to Make the Ultimate Boston Cream Pie Recipe
Alright, let’s dive into making this beauty! I promise it’s easier than it looks – just follow these steps and you’ll have a showstopper dessert that’ll make everyone think you studied at a fancy pastry school.
Preparing the Sponge Cake Layers
First things first – preheat that oven to 350°F (175°C). Grease and flour two 9-inch round cake pans like you mean it – nothing worse than cakes sticking!
Now, the magic starts with creaming the butter and sugar. This is where patience pays off – beat them together for a good 3-4 minutes until they’re light and fluffy. Don’t rush this step! Add the eggs one at a time, letting each fully incorporate before adding the next. A splash of vanilla goes in now too – that heavenly scent means you’re on the right track.
In another bowl, whisk together your dry ingredients – flour, baking powder, and that pinch of salt. Alternate adding the dry mix and milk to your butter mixture, starting and ending with flour. Mix just until combined – overmixing makes tough cakes, and we want cloud-like layers!
Divide the batter evenly between your prepared pans (I like using a scale for precision, but eyeballing works too). Bake for 20-25 minutes until golden and a toothpick comes out clean. Let them cool in the pans for 5 minutes, then turn out onto racks to cool completely. No cheating – warm cakes will melt your filling!
Making the Custard Filling
While your cakes cool, let’s make the star of the show – that luscious custard. If you’re short on time, quality store-bought pastry cream works in a pinch, but homemade? Oh my.
My foolproof method: whisk together egg yolks, sugar, and cornstarch until pale. Heat milk just to a simmer, then slowly pour half into the egg mixture while whisking like crazy (this is called tempering – it prevents scrambled eggs in your custard!). Pour everything back into the saucepan and cook over medium, stirring constantly, until thick like pudding. Off heat, stir in butter and vanilla. Press plastic wrap directly on the surface (this prevents a skin) and chill until cold – at least 2 hours, but overnight’s even better.
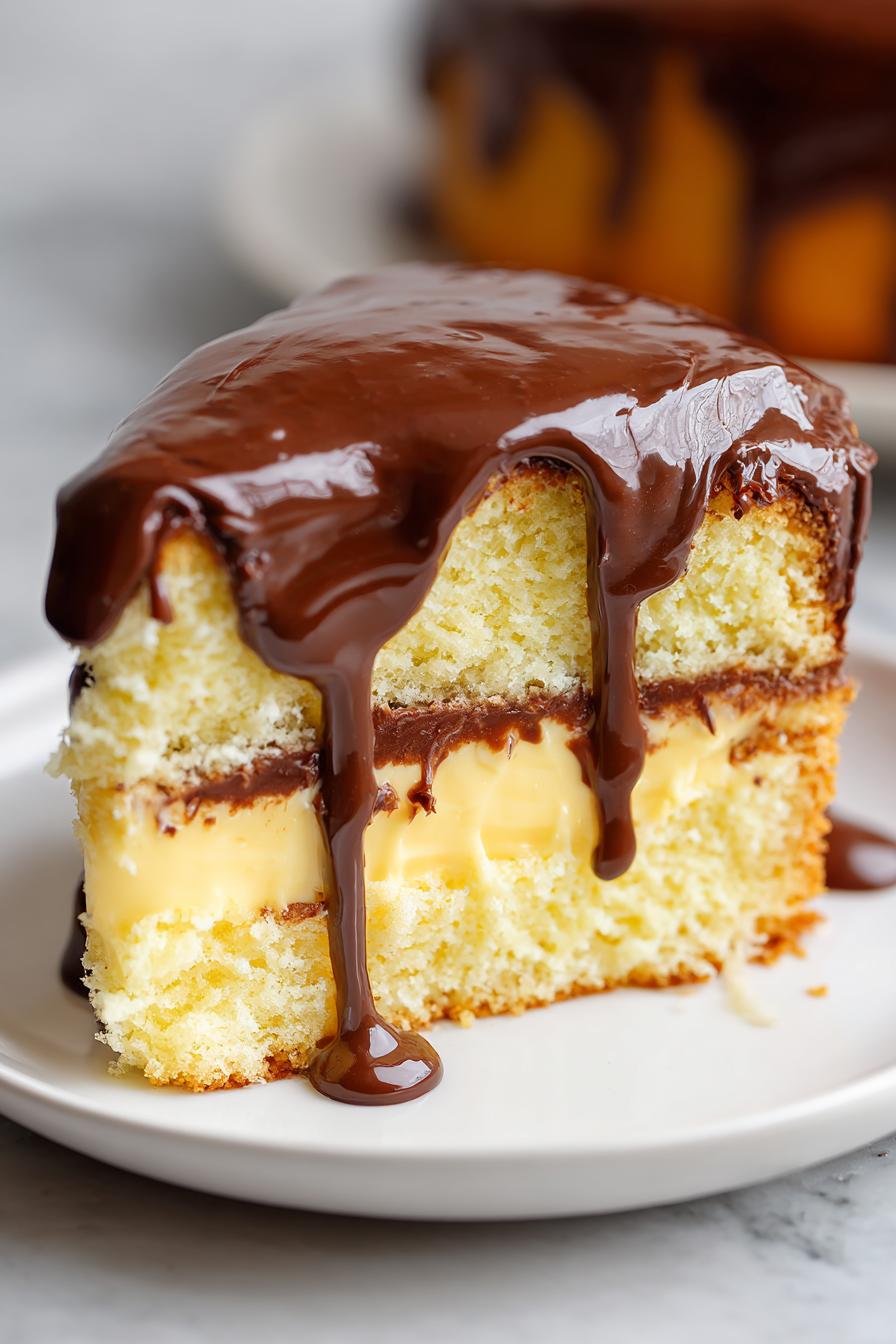
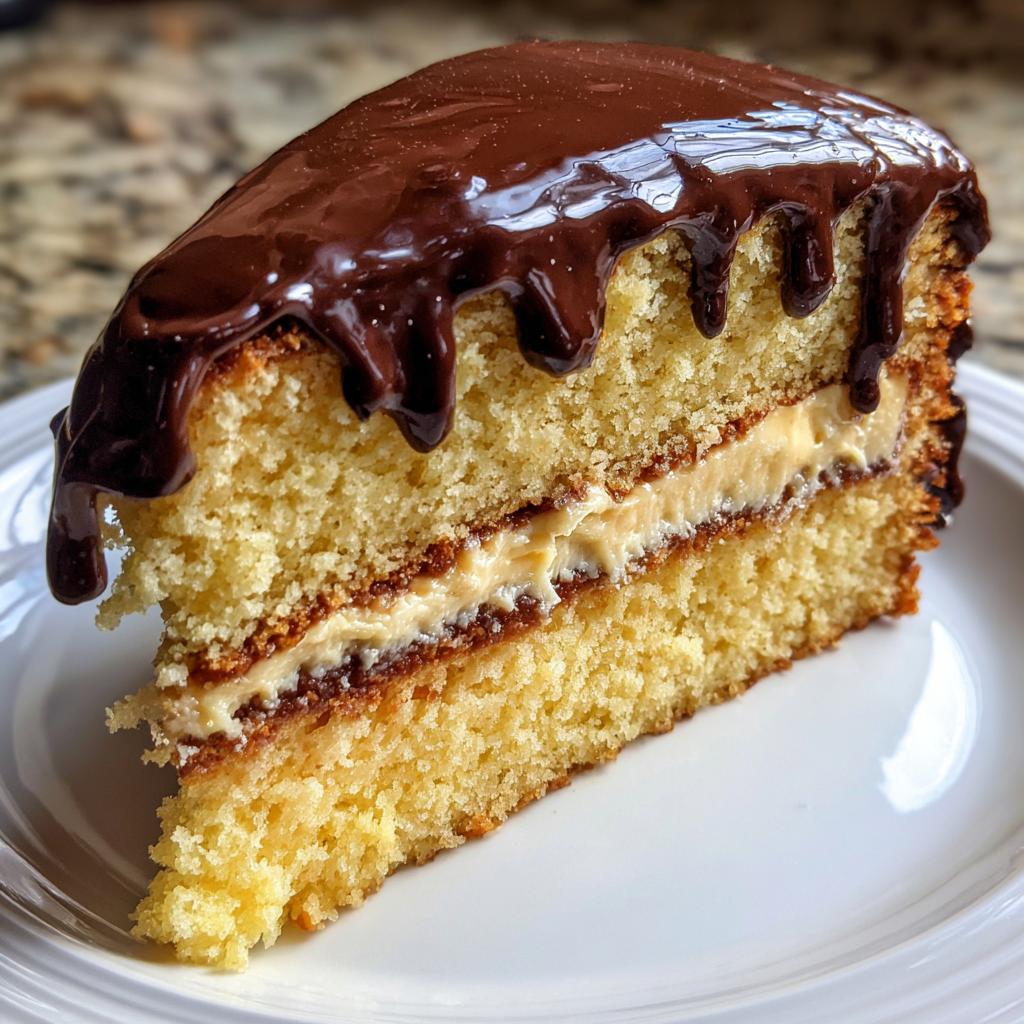
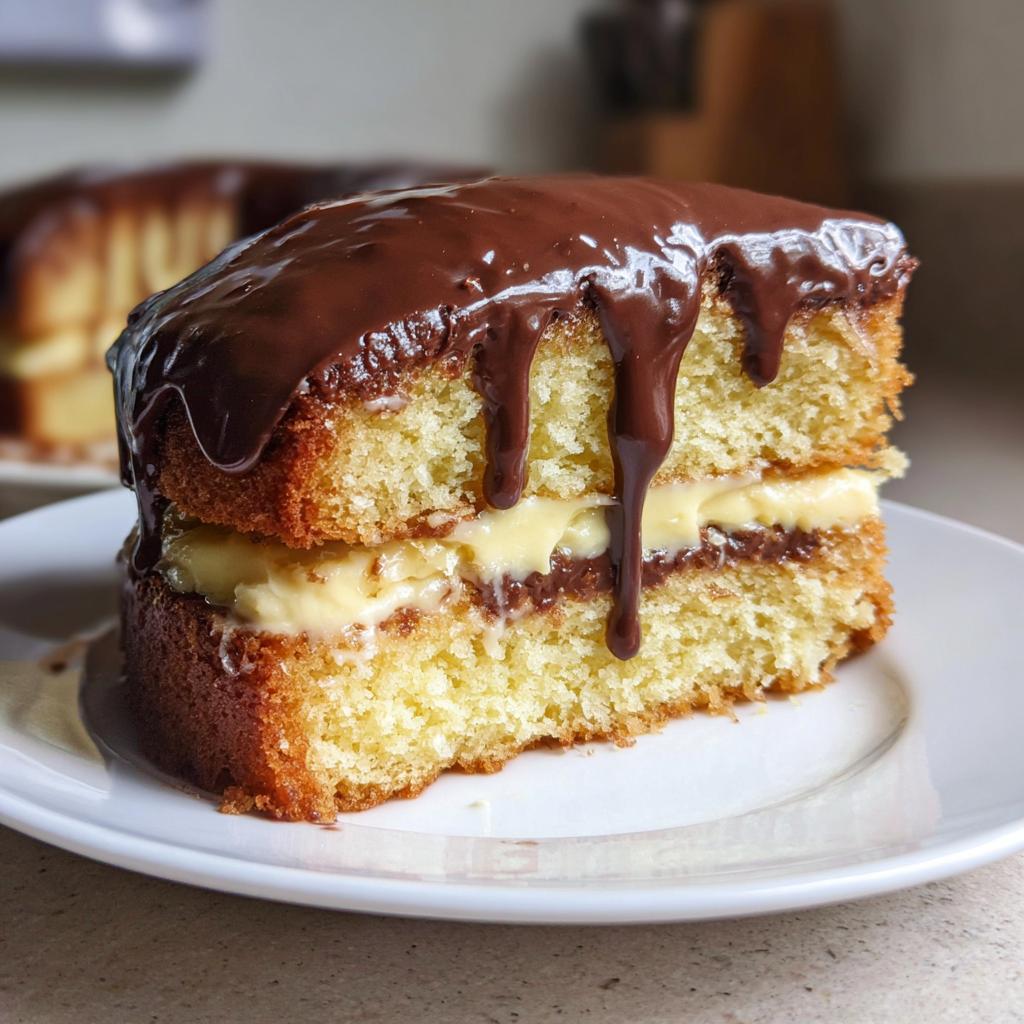
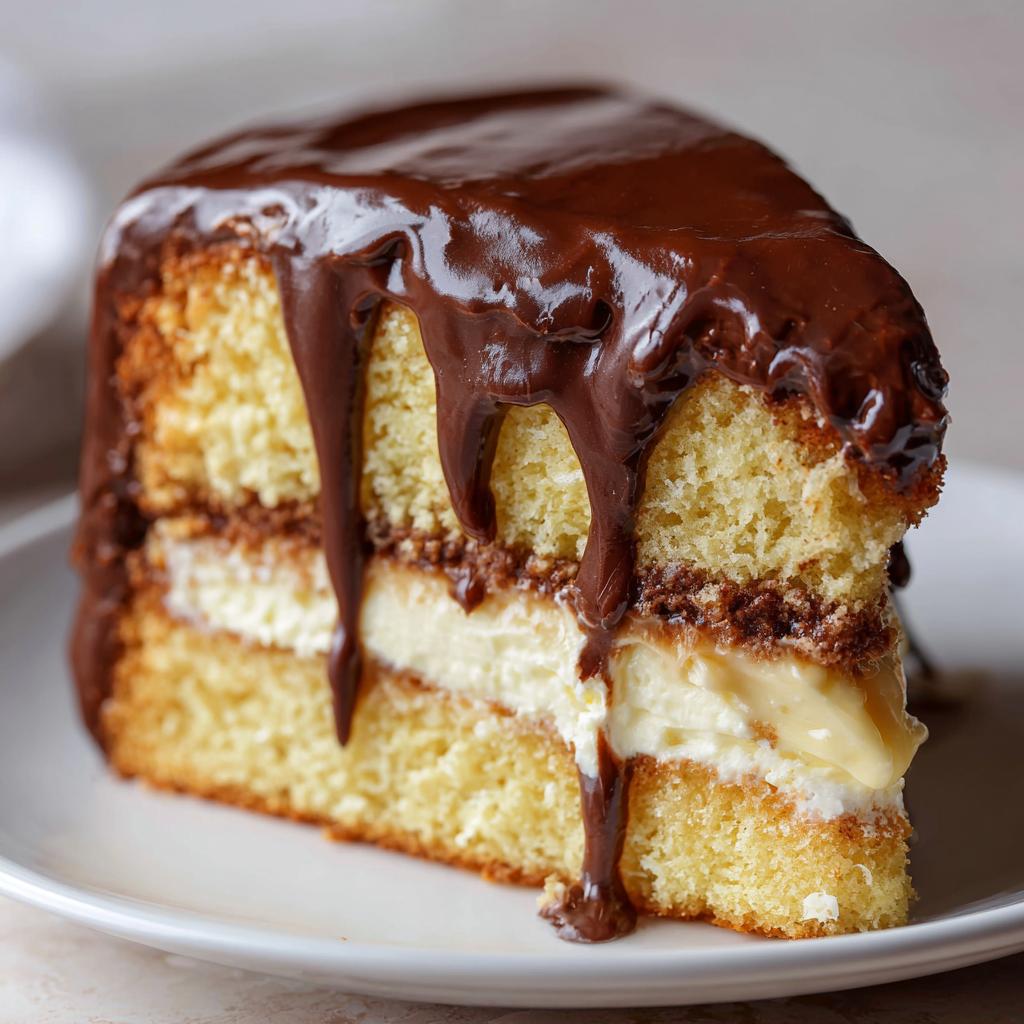
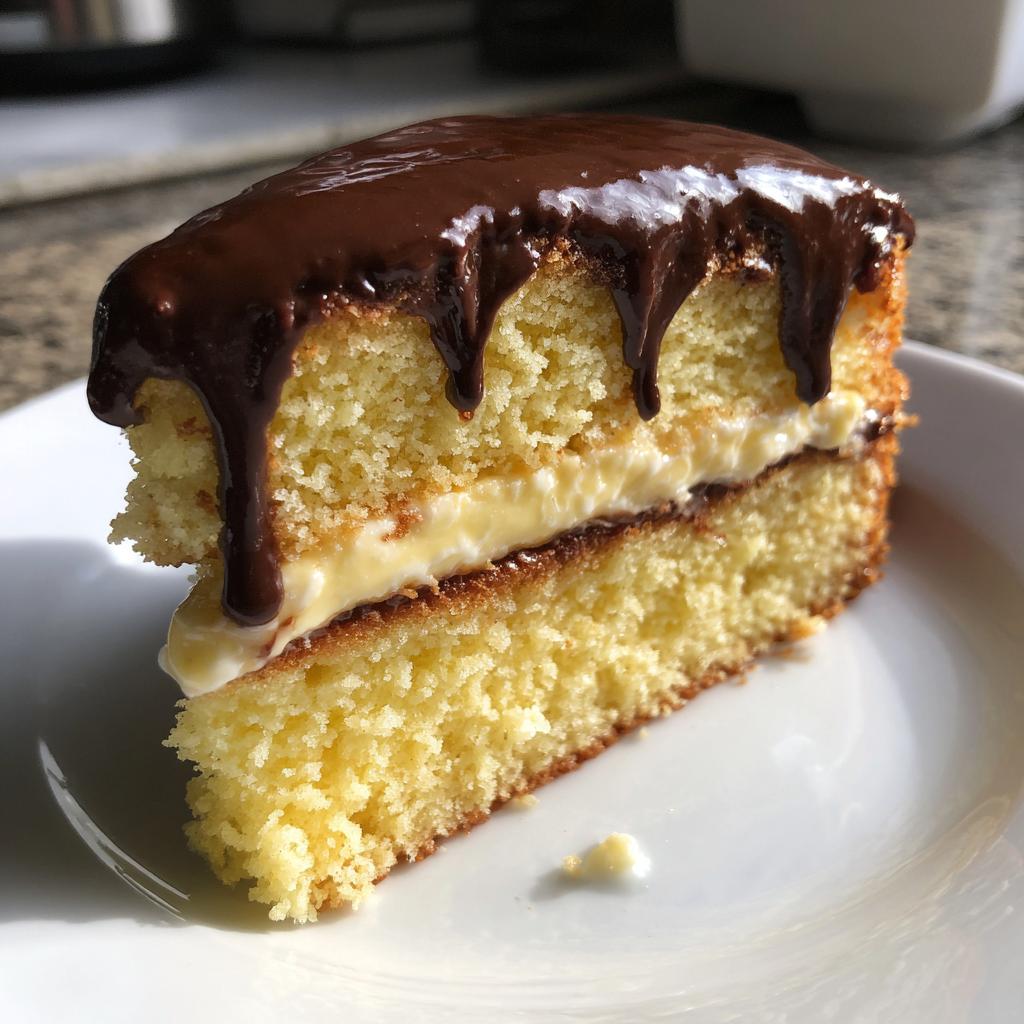
Assembling and Glazing the Cake
The grand finale! Place one cake layer on your serving plate. Spread all that glorious custard evenly over top – go almost to the edges but leave a small border so it doesn’t squish out. Gently place the second layer on top.
For the glaze: heat cream until just simmering, then pour over chopped chocolate. Let it sit for a minute (patience!), then stir until smooth. Let it cool slightly – you want it pourable but not runny. Slowly pour over the top, using an offset spatula to nudge it toward the edges so it drips down those beautiful sides in artful streaks.
Now the hardest part – refrigerate at least an hour before slicing. That wait makes the custard set and the flavors meld perfectly. Trust me, it’s worth it!
Tips for the Perfect Ultimate Boston Cream Pie Recipe
After making this Boston Cream Pie more times than I can count, I’ve picked up some tricks that’ll take yours from good to “Oh my goodness, can I have the recipe?” level:
Temperature matters! Room-temperature eggs and butter incorporate better into the batter. For the custard, chilling it thoroughly (I’m talking at least 2 hours) makes it easier to spread without turning your cake layers into a soggy mess.
When it comes to the chocolate glaze, here’s my secret – let it cool until it’s the consistency of warm honey. Too hot and it’ll run everywhere; too cool and it won’t pour smoothly.
And the golden rule? Always assemble your cake on the plate you’ll serve it on – trying to move it after glazing is a recipe for disaster. Learned that one the hard way!
Variations of the Ultimate Boston Cream Pie Recipe
While the classic version is perfection, sometimes it’s fun to switch things up! Here are my favorite ways to play with this recipe:
For a subtle twist, swap half the vanilla extract for almond extract – that nutty note pairs beautifully with the custard. Feeling fancy? Use dark chocolate for the glaze instead of semisweet – it adds a sophisticated bitterness that balances the sweetness. My neighbor swears by adding a tablespoon of bourbon to the custard for adults-only versions (just simmer off the alcohol first!). The best part? This recipe welcomes creativity – make it your own!
Serving and Storing the Ultimate Boston Cream Pie Recipe
Here’s the thing about Boston Cream Pie – it actually gets better after some quality fridge time! I always chill mine for at least an hour (okay, sometimes I cheat at 45 minutes…) before serving. That rest lets the custard set perfectly and makes clean slices possible. Use a sharp knife dipped in hot water for picture-perfect portions.
Leftovers? Ha! Just kidding. If by some miracle you have any, store it covered in the fridge for up to 3 days. The custard stays dreamy, though the glaze might lose a bit of its shine (still tastes amazing though!). I don’t recommend freezing – that custard texture just isn’t the same after thawing.
Nutritional Information
Just so you know what you’re indulging in (not that it’ll stop any of us!), here’s the scoop on nutrition per slice. These numbers are estimates – your exact amounts will vary based on ingredient brands and how generous you are with that custard filling!
- Calories: 320
- Sugar: 25g
- Fat: 15g
- Carbs: 42g
- Protein: 4g
Remember, life’s too short to count calories when there’s Boston Cream Pie involved. Everything in moderation – including moderation!
Frequently Asked Questions
I’ve gotten so many questions about this Boston Cream Pie over the years – here are the ones that pop up most often!
Can I use boxed cake mix instead of making the sponge from scratch?
Absolutely! While homemade sponge has that special touch, a good quality yellow cake mix works in a pinch. Just follow the box directions for two 9-inch layers. My tip? Add an extra teaspoon of vanilla to make it taste more homemade.
How long does Boston Cream Pie keep in the fridge?
It stays fresh for about 3 days if you can resist eating it all! Keep it covered so the custard doesn’t dry out. The glaze might lose some shine, but the flavor just gets better.
Can I make this ahead for a party?
You’re singing my song! The cake layers can bake 1-2 days early (wrap tightly in plastic). Make the custard 1 day ahead too. Just assemble and glaze the morning of your event – easy peasy!
My glaze is too thin – how can I fix it?
Been there! If it’s runny, add more chopped chocolate a tablespoon at a time until it thickens. Too thick? Stir in warm cream by the teaspoon until it’s pourable. You’ve got this!
Share Your Ultimate Boston Cream Pie Recipe Experience
I’d love to hear how your Boston Cream Pie turns out! Did you stick with the classic or try a fun variation? Drop a comment below – your baking adventures might just inspire someone else’s kitchen magic.
For more delicious recipes and ideas, check out our blog and follow us on Pinterest!
Print
Irresistible Boston Cream Pie Recipe – 5 Simple Steps to Perfection
- Total Time: 45 minutes
- Yield: 1 cake (8 servings) 1x
- Diet: Vegetarian
Description
A classic Boston Cream Pie with layers of sponge cake, rich custard, and chocolate glaze. Perfect for any occasion.
Ingredients
- 1 cup all-purpose flour
- 1 cup granulated sugar
- 1/2 cup unsalted butter, softened
- 2 large eggs
- 1 tsp vanilla extract
- 1/2 cup milk
- 1 1/2 tsp baking powder
- 1/4 tsp salt
- 1 cup custard or pastry cream
- 1/2 cup heavy cream
- 4 oz semisweet chocolate, chopped
Instructions
- Preheat oven to 350°F (175°C). Grease and flour two 9-inch round cake pans.
- In a bowl, mix flour, baking powder, and salt. Set aside.
- Cream butter and sugar until light and fluffy. Add eggs one at a time, then vanilla.
- Alternately add dry ingredients and milk, mixing until smooth.
- Divide batter between pans. Bake for 20-25 minutes or until a toothpick comes out clean.
- Cool cakes completely. Spread custard over one layer, then top with the second layer.
- Heat heavy cream until simmering, pour over chocolate, and stir until smooth.
- Pour glaze over the cake, spreading evenly. Chill before serving.
Notes
- Use room temperature ingredients for best results.
- Chill the custard before assembling the cake.
- Let the glaze cool slightly before pouring for a smoother finish.
- Prep Time: 20 minutes
- Cook Time: 25 minutes
- Category: Dessert
- Method: Baking
- Cuisine: American
Nutrition
- Serving Size: 1 slice
- Calories: 320
- Sugar: 25g
- Sodium: 120mg
- Fat: 15g
- Saturated Fat: 9g
- Unsaturated Fat: 5g
- Trans Fat: 0g
- Carbohydrates: 42g
- Fiber: 1g
- Protein: 4g
- Cholesterol: 70mg