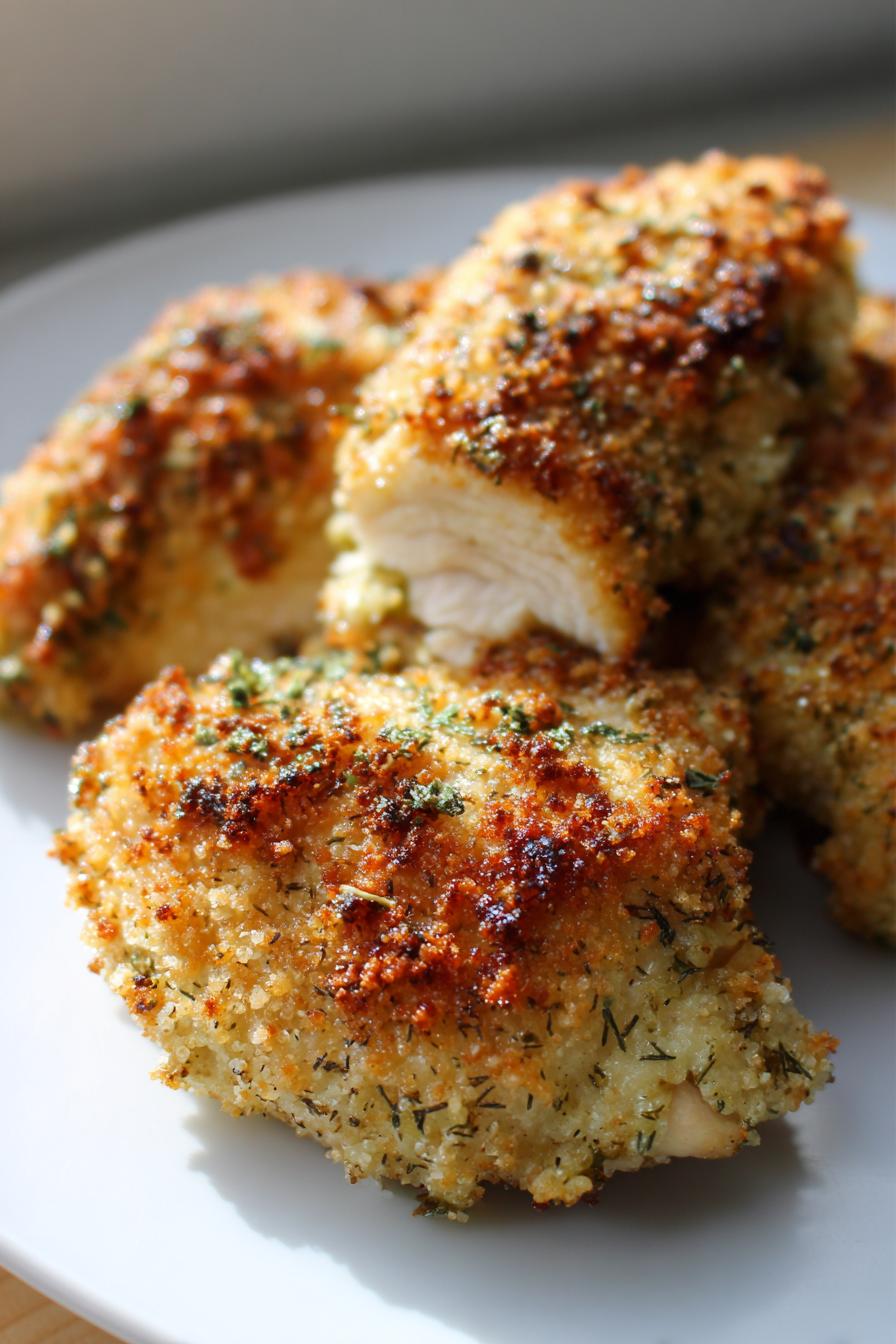
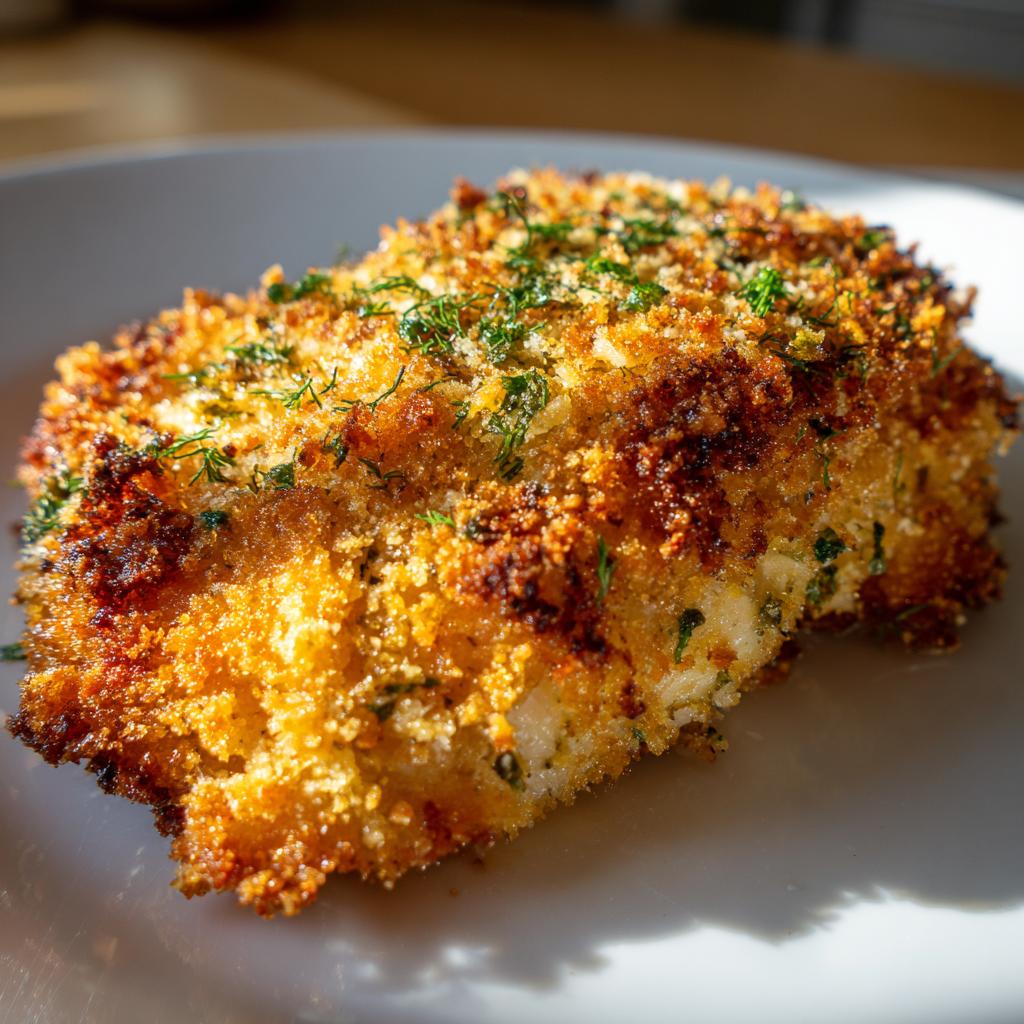
Crispy Dill Pickle Parmesan Chicken: 4 Secrets to Perfect Crunch
Oh my gosh, you have to try this Crispy Dill Pickle Parmesan Chicken – it’s like all your favorite snack flavors decided to throw a party on a chicken breast! I stumbled onto this magical combo one lazy Sunday when I was craving something crunchy, tangy, and completely different from the usual breaded chicken. That jar of dill pickles sitting on my fridge shelf? Turns out they make the most incredible crispy coating when crushed up with Parmesan cheese. The salty sharpness of the cheese balances perfectly with that vinegary pickle punch, creating a flavor explosion that’ll make you wonder why you ever bothered with plain old breadcrumbs. Trust me, once you taste that golden, crackly crust giving way to juicy chicken, you’ll be hooked just like I was!
Why You’ll Love This Crispy Dill Pickle Parmesan Chicken
Listen, I don’t just throw around words like “life-changing” lightly, but this chicken? Oh, it’s a game-changer. Here’s why you’ll be obsessed:
- Crazy-crunchy texture: That crushed pickle and Parmesan coating? It bakes up so crisp you’ll hear the crunch across the room.
- Bold, tangy flavor: The dill pickle adds that addictive briny kick, while the Parmesan brings nutty, salty depth—no boring chicken here!
- Weeknight magic: From fridge to table in 35 minutes flat (yes, I’ve timed it). Even my picky nephew devours it.
- Pantry-friendly: No fancy ingredients—just stuff you probably already have, plus one genius jar of pickles.
Seriously, this is the kind of recipe you’ll make once and then text to all your friends. Don’t say I didn’t warn you! You can find more great recipe ideas on our blog.
Ingredients for Crispy Dill Pickle Parmesan Chicken
Okay, let’s talk ingredients – and trust me, you’ll want to measure carefully here to get that perfect pickle-parm balance! Here’s exactly what you’ll need:
- 4 boneless, skinless chicken breasts (about 6 oz each – I always pat them dry with paper towels first so the coating sticks better)
- 1 cup finely crushed dill pickle chips (measure AFTER crushing – I pulse them in my food processor until they’re like coarse breadcrumbs)
- ½ cup packed freshly grated Parmesan cheese (none of that powdery stuff in the green can – real Parmesan makes all the difference!)
- ½ cup plain breadcrumbs (I’ve used panko in a pinch, but regular gives the best crispy texture)
- 1 tsp garlic powder (this is my secret flavor booster – don’t skip it!)
- 1 tsp paprika (smoked or sweet, both work great)
- ¼ tsp black pepper (freshly ground if you’ve got it)
- 2 large eggs, beaten (I whisk mine with a fork in a shallow bowl – perfect for dipping)
- 2 tbsp olive oil (just enough for that golden sear – you can eyeball this one)
Quick tip: If your pickle chips seem extra wet after crushing, squeeze ’em in a paper towel to remove excess juice. Too much moisture = soggy coating, and we definitely don’t want that!
Equipment You’ll Need
Now don’t stress – you don’t need fancy gadgets for this crispy chicken magic! Here’s what I always grab from my kitchen:
- Large mixing bowl (for that glorious pickle-parm coating – mine’s usually stained yellow from all the Parmesan)
- Shallow dish or pie plate (perfect for the egg wash – I use my grandma’s old ceramic one)
- Heavy skillet (cast iron if you’ve got it – nothing gives that perfect golden sear better!)
- Rimmed baking sheet (lined with foil for easy cleanup – because who wants to scrub pans afterward?)
- Food processor (to crush those pickles into perfect little bits – though a zip-top bag and rolling pin works in a pinch!)
- Measuring cups & spoons (eyeballing the Parmesan never ends well – ask me how I know)
- Tongs (for flipping those chicken breasts without losing your precious coating)
See? Nothing crazy. Just good, basic tools that’ll help you nail this recipe on the first try. Now let’s get cooking!
How to Make Crispy Dill Pickle Parmesan Chicken
Alright, let’s get to the fun part—making this crispy, tangy masterpiece! Don’t worry, it’s way easier than you think, and I’ll walk you through each step so you get that perfect crunch every time.
Preparing the Coating
First things first—that magical coating! In a large bowl, mix together your crushed dill pickles, Parmesan, breadcrumbs, garlic powder, paprika, and black pepper. Now, here’s my trick: use your fingers to really combine everything. You want it to feel like slightly damp sand—those pickle bits should be evenly distributed so every bite packs that tangy punch.
The texture should cling together when you pinch it, but not be soggy. If it feels too wet (sometimes those pickles can be juicy), sprinkle in a tiny bit more breadcrumbs. Taste a pinch—yes, really!—to check the seasoning. You should get that salty, briny, slightly spicy kick all at once. That’s how you know it’s perfect.
Coating and Cooking the Chicken
Okay, here’s where the magic happens! Preheat your oven to 400°F (200°C) while you work—trust me, you want that oven HOT when the chicken goes in.
Dip each chicken breast in the beaten eggs, letting the excess drip off—no eggy puddles here! Then, press it firmly into the pickle mixture. I mean really press! Coat both sides, then pat the mixture onto the edges too. You want every inch covered in that crispy goodness. Pro tip: use one hand for the egg dip and the other for the coating to avoid “gloves” of breading on your fingers (though licking them after is half the fun).
Heat your olive oil in a skillet over medium-high heat until it shimmers—about 2 minutes. Carefully add the chicken (don’t crowd the pan!) and sear for 2-3 minutes per side until golden brown. That sizzle? That’s the sound of flavor being locked in!

Transfer the chicken to your prepared baking sheet and pop it in the oven for 15-18 minutes, until the internal temp hits 165°F (74°C). The smell will drive you crazy—in the best way. When it comes out, let it rest for 3 minutes (I know, torture!) so the juices redistribute. Then? Dig in and listen for that CRUNCH.
Tips for Perfect Crispy Dill Pickle Parmesan Chicken
Want to take your chicken from “good” to “can’t-stop-eating-it” amazing? These are my hard-earned tricks after making this recipe way too many times (not that anyone’s complaining!).
Broil for the ultimate crunch: If your chicken’s golden but not quite as crispy as you’d like, pop it under the broiler for just 1-2 minutes at the end. Watch it like a hawk though—that Parmesan goes from perfect to burnt in seconds! I learned that the hard way when I got distracted by my phone.
Press, don’t sprinkle: When coating your chicken, don’t just lay it in the mixture—press that coating on like you mean it! I use the palm of my hand to really adhere it. More pressure = less falling off later. My sister calls it “angry chicken” because I look so intense doing it.
Thermometer beats guessing: Even after years of cooking, I still use my instant-read thermometer. Pull the chicken at 165°F (74°C)—any higher and it dries out. That perfect juicy interior with the crispy crust? That’s thermometer magic right there.
Dry those pickles: After crushing your pickles, spread them on paper towels and press gently to remove excess juice. Wet pickles = soggy coating. I may or may not have once skipped this step and ended up with what my kids called “sad pickle soup chicken.” Never again!
Rest before cutting: I know it’s tempting to dig right in, but let the chicken rest 3-5 minutes after baking. Those juices need time to settle back into the meat instead of running all over your plate. Use the time to make your dipping sauce—I won’t judge if you sneak a tiny corner piece though.
Variations for Crispy Dill Pickle Parmesan Chicken
Listen, I love the original recipe to bits, but sometimes you gotta switch things up, right? Here are my favorite twists that keep this chicken exciting every time I make it – and believe me, I’ve tried them all!
Panko power: Swap regular breadcrumbs for panko when you want extra crunch. Those big, flaky Japanese breadcrumbs create this incredible shattering crispness that’s next-level. Just reduce the Parmesan slightly since panko’s so light. My husband always knows when I’ve used panko – he says it sounds like he’s eating fried chicken!
Spice it up: Add ¼ to ½ teaspoon of cayenne pepper to the coating mix if you like heat. The first time I did this, I may have gone overboard (hello, fire-breathing chicken!) but the perfect amount gives this gorgeous slow burn that plays so nicely with the cool dill flavor. For my kids, I’ll sometimes just sprinkle a little cayenne on my portion after baking.
Air fryer magic: Oh boy, if you’ve got an air fryer, you’re in for a treat! Skip the oven – after searing, cook at 375°F (190°C) for about 10 minutes, flipping halfway. The circulating air makes the coating extra crispy all over. Just don’t overcrowd the basket (I speak from messy experience). This is my go-to method when it’s too hot to turn on the big oven.
Thighs for days: Chicken thighs work beautifully here if you prefer dark meat. They stay juicier and can handle longer cooking if needed. Just flatten them slightly so they cook evenly – I put them between parchment and give them a few good whacks with my rolling pin. The kids think it’s hilarious when mom’s “beating up” dinner.
Pickle juice marinade: For extra tangy flavor, soak the chicken in pickle juice for 30 minutes before breading. It tenderizes the meat and amps up that briny goodness. I usually reserve the juice from the pickle jar just for this – waste not, want not!
The best part? You can mix and match these ideas. Panko and cayenne? Yes please! Air-fried thighs with pickle juice marinade? Absolute perfection. That’s the beauty of this recipe – it’s like a choose-your-own-adventure for crispy chicken lovers! If you enjoy experimenting with flavors, check out our Chrupiący kalafior i brokuły z czosnkiem i parmezanem for another crispy side idea.
Serving Suggestions
Okay, let’s talk about what to serve with this flavor-packed chicken – because that crispy, tangy goodness deserves equally amazing sidekicks! Here are my go-to pairings that turn this dish into a full-on meal:
Ranch or garlic aioli for dipping: I mean, is it even pickle chicken without ranch? But my secret is stirring a tablespoon of pickle juice into the ranch for extra tang. If I’m feeling fancy, I’ll whip up a quick garlic aioli with mayo, lemon, and roasted garlic. The creamy coolness cuts through that crispy coating perfectly.
Roasted baby potatoes: Toss them with olive oil, salt, and rosemary, then roast at 400°F (200°C) alongside the chicken. The last 5 minutes? Sprinkle with Parmesan to get them all crusty and golden. They soak up any leftover pickle-parm flavors from the chicken like little flavor sponges. For a similar side, try our Pieczone buraki z czosnkiem i oliwą.
Simple coleslaw: Not the gloppy kind – just shredded cabbage, carrots, and a light dressing of mayo, vinegar, and a pinch of sugar. That crisp freshness balances the richness of the chicken. Sometimes I’ll even add a handful of chopped pickles right into the slaw for double pickle power!
Buttered corn on the cob: When it’s summer and corn is sweet, this is my absolute favorite pairing. The sweetness plays off the salty chicken so well. Pro tip: mix a little chili powder into your butter for an extra flavor punch that’ll make everyone ask for your secret.
For super busy nights? Bagged salad and frozen fries work in a pinch too – no judgment here! The chicken’s the star anyway. Just be sure to have plenty of napkins ready – this is gloriously messy eating at its finest. You can see more serving inspiration on our Pinterest page.
Storing and Reheating
Now, I know you’ll probably devour this chicken straight away (who wouldn’t?), but if you somehow end up with leftovers – first of all, wow, impressive self-control! – here’s how to keep them tasting just as amazing:
Fridge storage: Let the chicken cool completely (about 30 minutes) before storing, or you’ll get soggy from all that trapped steam. I use an airtight container with paper towels underneath to absorb any moisture – keeps it crispier longer. It’ll stay good for up to 3 days, though day two is usually when it tastes best to me – those pickle flavors really settle in!
Reheating magic: Whatever you do, DO NOT microwave unless you want sad, rubbery chicken! Here’s what works best:

- Oven method: 375°F (190°C) for about 10 minutes on a wire rack (so air circulates all around). Spritz lightly with oil if the coating looks dry – gives it that fresh-from-the-oven crispness.
- Air fryer fix: 350°F (175°C) for 5-7 minutes is my go-to. The hot air works wonders at bringing back that crunch without drying out the chicken.
- Skintervention: If you’re pressed for time, a quick 2-minute sear in a hot skillet can revive the crust beautifully. Just flip carefully!
One last tip? If you’re meal prepping, store the uncooked breaded chicken on parchment in the fridge for up to a day before cooking. That way you get fresh-cooked crispiness whenever you’re ready. My future self always thanks me when I do this on busy weeks!
FAQs About Crispy Dill Pickle Parmesan Chicken
I get asked about this recipe all the time – seems like everyone wants to know how to make it perfect! Here are the questions that pop up most often, along with my tried-and-true answers:
Can I use pickle juice in this recipe?
Absolutely! I actually love using pickle juice in two ways: First, you can marinate the chicken in it for 30 minutes before breading (just pat dry afterward). Second, stir a tablespoon into your dipping sauce for extra tang. Just don’t add it directly to the coating mixture – that’ll make it too wet.
Will chicken thighs work instead of breasts?
Yes, and they’re delicious! Thighs stay juicier and can handle longer cooking if needed. Just flatten them slightly so they cook evenly – I put them between parchment and gently pound them with a rolling pin until they’re an even thickness. You might need an extra 2-3 minutes baking time.
How do I prevent a soggy coating?
Three secrets: 1) Squeeze excess juice from your crushed pickles (I use paper towels). 2) Make sure your oil is properly hot before searing – it should shimmer. 3) Don’t overcrowd the pan when baking – space those chicken pieces out! If all else fails, that quick broil at the end saves the day.
Can I make this gluten-free?
You bet! Just swap regular breadcrumbs for gluten-free ones (I like the ones made from rice flour). Everything else is naturally gluten-free. My gluten-sensitive neighbor swears she can’t tell the difference when I make it this way.
What’s the best way to crush the pickles?
My food processor gives the most consistent texture (pulse 5-6 times), but a zip-top bag and rolling pin works in a pinch! You want them coarse like breadcrumbs – not powder, not big chunks. And definitely don’t use pickle relish – the texture’s all wrong.
Got more questions? Hit me up in the comments – I could talk about this chicken all day! Just be warned: once you start making it, you might get addicted. Not that I’d know anything about that…
Nutritional Information
Now, I’m no nutritionist, but I know folks like to have a general idea of what they’re eating – especially when it’s something as deliciously addictive as this chicken! Keep in mind that all these numbers are rough estimates since ingredients vary so much (like how salty your Parmesan is or how juicy your chicken breasts are). Here’s the scoop:
Each serving gives you a good balance of protein to keep you full, with that crispy coating adding just enough carbs to make it satisfying. The Parmesan brings calcium to the party, while those pickles? They’ve got that gut-friendly vinegar goodness going on. The olive oil provides healthy fats, and let’s be real – that’s what makes everything taste so darn good!
Remember: Nutritional values are estimates and vary based on ingredients/brands used. If you’re watching specific numbers closely, you’ll want to calculate based on your exact ingredients. But honestly? Sometimes it’s okay to just enjoy the flavor without overanalyzing – life’s too short not to savor that perfect pickle-parm crunch!
Print
Crispy Dill Pickle Parmesan Chicken: 4 Secrets to Perfect Crunch
- Total Time: 35 minutes
- Yield: 4 servings 1x
- Diet: Low Lactose
Description
A crispy and flavorful chicken dish coated with crushed dill pickles and Parmesan cheese for a tangy, crunchy bite.
Ingredients
- 4 boneless, skinless chicken breasts
- 1 cup crushed dill pickle chips
- 1/2 cup grated Parmesan cheese
- 1/2 cup breadcrumbs
- 1 tsp garlic powder
- 1 tsp paprika
- 1/4 tsp black pepper
- 2 eggs, beaten
- 2 tbsp olive oil
Instructions
- Preheat oven to 400°F (200°C).
- In a bowl, mix crushed dill pickles, Parmesan, breadcrumbs, garlic powder, paprika, and black pepper.
- Dip each chicken breast in beaten eggs, then coat with the pickle mixture.
- Heat olive oil in a skillet over medium-high heat.
- Sear chicken for 2-3 minutes per side until golden.
- Transfer to a baking sheet and bake for 15-18 minutes until fully cooked.
- Serve immediately.
Notes
- Use a food processor to crush the pickles finely.
- For extra crispiness, broil for 1-2 minutes after baking.
- Pair with ranch or garlic aioli for dipping.
- Prep Time: 15 minutes
- Cook Time: 20 minutes
- Category: Main Dish
- Method: Baking
- Cuisine: American
Nutrition
- Serving Size: 1 chicken breast
- Calories: 320
- Sugar: 2g
- Sodium: 580mg
- Fat: 14g
- Saturated Fat: 4g
- Unsaturated Fat: 8g
- Trans Fat: 0g
- Carbohydrates: 12g
- Fiber: 1g
- Protein: 32g
- Cholesterol: 150mg